今回はNSX-TのDestination NATの検証証跡をまとめました。
概要
NSX-TのDestination NAT
物理ネットワークからNSX-Tの仮想ネットワークへのトラフィックの送信先アドレスを変換したい場合に、Destination NATを使用します。(逆向きのトラフィックに対してDestination NATを適用することはできません。)

検証結果
検証内容、構成
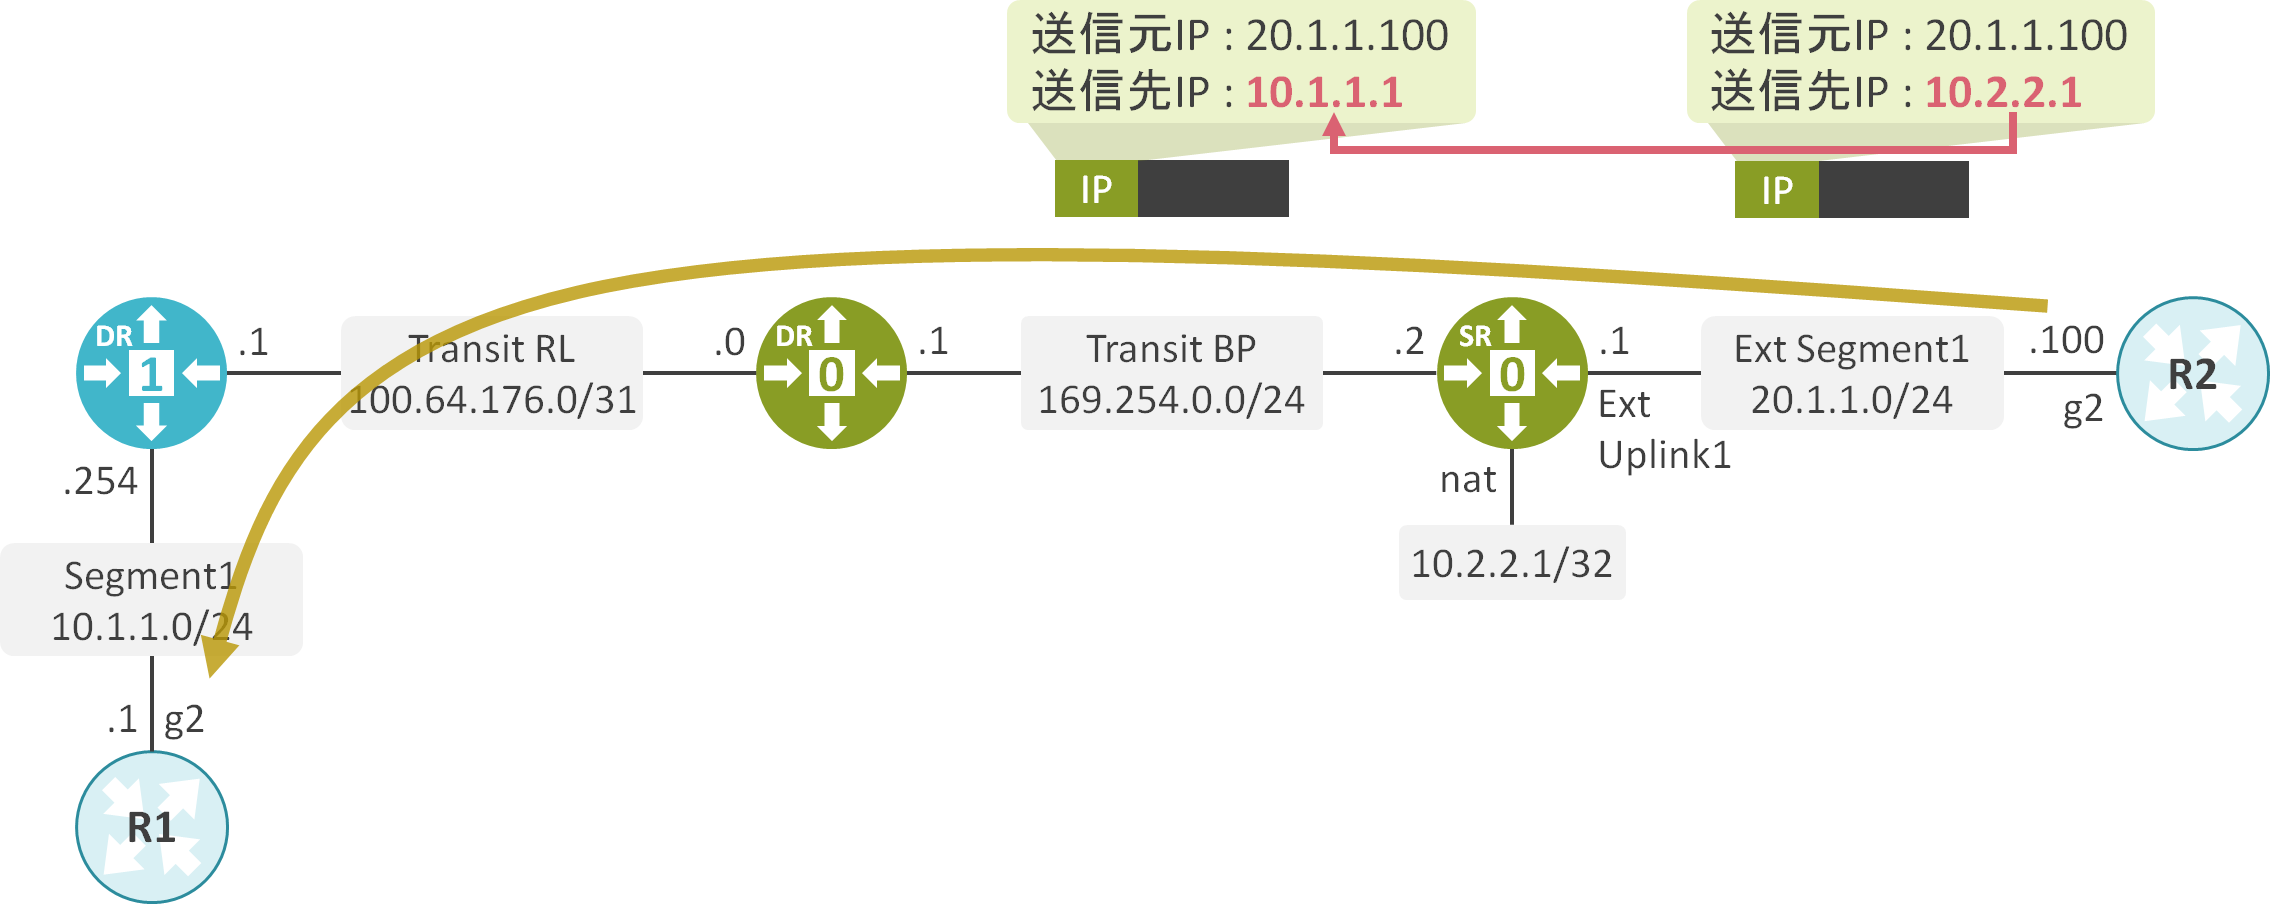
Tier-1 GWでSegment 1を収容します。
Tier-1 GWとTier-0 GWを接続します。
NSX EdgeにTier-0 GWのSRを配置し、物理ネットワークとNSX-Tの仮想ネットワークを接続します。
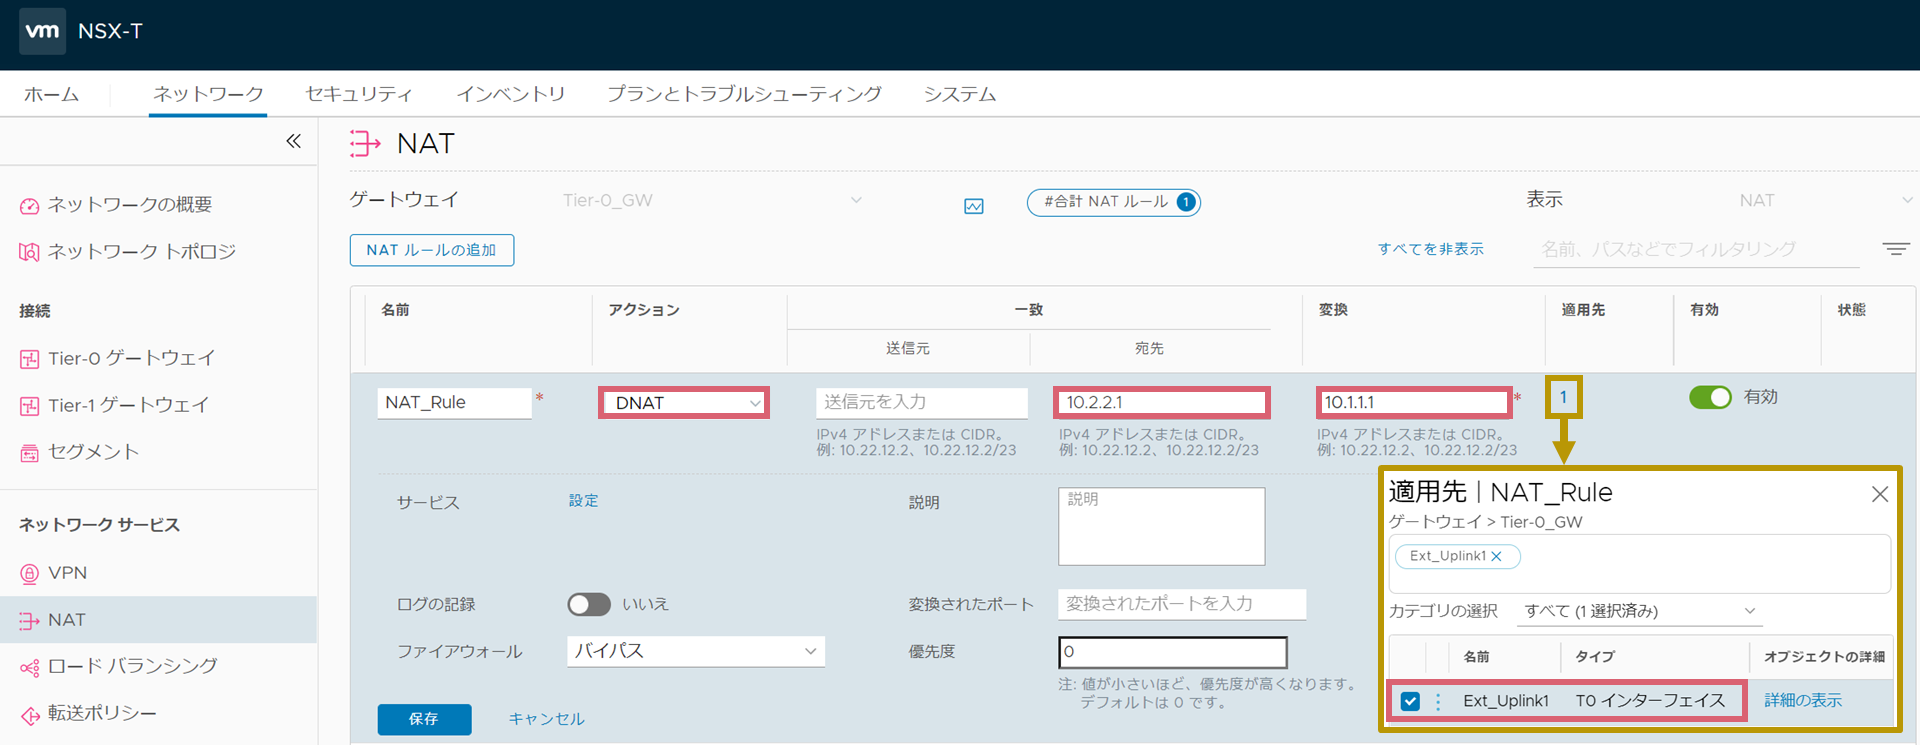
Tier-0 GWのSRでDestination NATを設定し、パケットの送信先アドレスを10.2.2.1から10.1.1.1に変更します。

ネットワーク機器のCLIの設定
interface GigabitEthernet2
 ip address 10.1.1.1 255.255.255.0
!
ip route 0.0.0.0 0.0.0.0 10.1.1.254
interface GigabitEthernet2
 ip address 20.1.1.100 255.255.255.0
!
ip route 0.0.0.0 0.0.0.0 20.1.1.1
NATの設定
Tier-0 GWのSRでパケットの送信先アドレスを10.2.2.1から10.1.1.1に変換するDestination NATを設定します。

Tier-0 GWのSRのUplinkに適用されたNATのルールの確認
Tier-0 GWのSRのUplinkに適用されたDestination NATのルールはget firewall <UUID> ruleset rulesコマンドで確認可能です。
パケットの送信先アドレスを10.2.2.1から10.1.1.1に変換するDestination NATのルールが存在することが確認できます。
edge1> get firewall 52a86792-791f-4d32-b826-e40a70efb6e4 ruleset rules
DNAT rule count: 1
    Rule ID   : 536871965
    Rule      : in protocol any natpass from any to ip 10.2.2.1
                interface uuid 52a86792-791f-4d32-b826-e40a70efb6e4 dnat ip 10.1.1.1

SNAT rule count: 0

Firewall rule count: 1
    Rule ID   : 3059
    Rule      : inout protocol any stateless from any to any accept
Tier-0 GWのSRのルーティングテーブルの確認
Tier-0 GWのSRのルーティングテーブルを見ると、Destination NAT変換前のアドレスが追加されていることが確認できます。
edge1> get logical-router f6d536a6-0edc-459c-9fff-bef1a717f5a7 route

Flags: t0c - Tier0-Connected, t0s - Tier0-Static, b - BGP,
t0n - Tier0-NAT, t1s - Tier1-Static, t1c - Tier1-Connected,
t1n: Tier1-NAT, t1l: Tier1-LB VIP, t1ls: Tier1-LB SNAT,
t1d: Tier1-DNS FORWARDER, t1ipsec: Tier1-IPSec, isr: Inter-SR,
> - selected route, * - FIB route

Total number of routes: 7

t1c> * 10.1.1.0/24 [3/0] via 100.64.176.1, linked-280, 01w1d11h
t0n> * 10.2.2.1/32 is directly connected, loopback-283, 00:00:10
t0c> * 20.1.1.0/24 is directly connected, uplink-276, 01w4d06h
t0c> * 100.64.176.0/31 is directly connected, linked-280, 01w1d11h
t0c> * 169.254.0.0/24 is directly connected, downlink-274, 03:32:14
t0c> * fcd4:ae0b:c612:b800::/64 is directly connected, linked-280, 01w1d11h
t0c> * fe80::/64 is directly connected, linked-280, 01w1d11h
疎通とセッション情報の確認
R2の20.1.1.100から10.2.2.1へPingを実施します。

R2の20.1.1.100から10.2.2.1へのPingが成功していることが確認できます。
R2#ping 10.2.2.1 source 20.1.1.100
Type escape sequence to abort.
Sending 5, 100-byte ICMP Echos to 10.2.2.1, timeout is 2 seconds:
Packet sent with a source address of 20.1.1.100
!!!!!
Success rate is 100 percent (5/5), round-trip min/avg/max = 1/1/5 ms
以下は10.1.1.0/24上でキャプチャしたR2の20.1.1.100から10.2.2.1へのICMP Echoになります。送信先アドレスが10.2.2.1から10.1.1.1に変換されていることが確認できます。

NSX Edge1のセッション情報を見ると、パケットの送信先アドレスが10.2.2.1から10.1.1.1に変換されれていることが確認できます。
edge1> get firewall 52a86792-791f-4d32-b826-e40a70efb6e4 connection state
Connection count: 1
20.1.1.100 -> 10.1.1.1 (10.2.2.1) dir in protocol icmp f-0 n-536871965


コメント